
Software Architect | Software Engineer | Principal Consultant | Paraglider | PhD
CI/CD with Angular 6 & Firebase & GitLab
Automate build, test and deployment using GitLab CI/CD
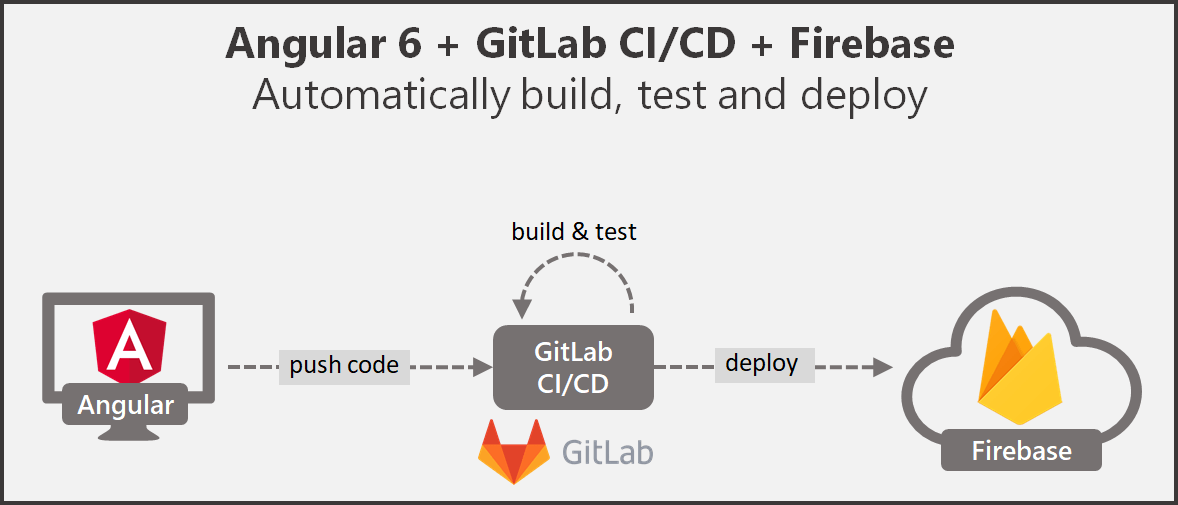
I recently wrote about how to CI/CD with Angular 6, Firebase and Bitbucket Pipelines. I received the feedback to also try out GitLab. Here we go.
Outline #
- Create GitLab Repository
- Create Angular 6 demo application
- Configuration Angular 6 for CI/CD (Build, Test, Deploy)
- Create Firebase project
- Configure CI/CD in GitLab
Prerequisites #
(1) Create GitLab repository #
First we create a new GitLab repository. You can find my demo repository here: https://gitlab.com/kniklas/angular-firebase-ci-demo

(2) Create Angular 6 Demo Application #
For this demonstration we create our Angular application with the Angular CLI. If you have not installed the CLI yet, use the following command to do so:
npm install -g @angular/cliIf you have already installed an older version of the angular CLI, use the following command to upgrade to the latest version as described here:
npm uninstall -g @angular/cli
npm cache verify
npm install -g @angular/cli@latest
Then we can create our Angular skeleton application:
ng new angular-firebase-ci-demoIf you are interested in what you just created start it with the build in server:
cd angular-firebase-ci-demo
ng serve -o
The command should automatically start your browser and navigate to http://localhost:4200/.
(3) Configuration Angular 6 for Build, Test and Deployment #
Angular 6 comes with 2 test tools: Karma for unit tests and Protractor for end-2-end or integration tests. You can find more about the differences here. Both approaches have in common, that they open a browser to execute the tests (which sounds reasonable, as we are building a front-end). During development we can run Karma based tests using the command ng test which opens a browser (Chrome), executes tests and re-runs all tests whenever code is changed. To execute Protractor based tests we use the command ng e2e which also opens a browser and runs the tests.
On our CI environment we only need to execute our test cases without the browser's GUI and memory overhead. With the headless mode of chrome, this is possible.
Puppeteer #
First, we need to include a browser in our CI environment. We will use the node library Puppeteer, which bundles chrome. With that, we can make sure, that we have the right browser whether we are on our development or on our CI environment.
npm install --save-dev puppeteerKarma Configuration #
We add a custom launcher in our karma.conf.js to start Chrome in a headless mode in our CI environment. Additionally, we need to use the option --no-sandbox, to make it work, as we made no additional user configuration on our docker image.
// ./angular-firebase-ci-demo/src/karma.conf.js

const puppeteer = require('puppeteer');
process.env.CHROME_BIN = puppeteer.executablePath();
module.exports = function (config) {
  config.set({
    (...)
    customLaunchers: {
      ChromeHeadlessNoSandbox: {
        base: 'ChromeHeadless',
        flags: ['--no-sandbox']
      }
    },
    (...)
  });
};
Protractor Configuration #
For e2e tests we add the following configuration file, to be able to call chrome in headless mode with the option --no-sandbox.
// ./angular-firebase-ci-demo/e2e/protractor-ci.conf.js

const config = require('./protractor.conf').config;
const puppeteer = require('puppeteer');

config.capabilities = {
  browserName: 'chrome',
  chromeOptions: {
    args: ['--headless', '--no-sandbox'],
    binary: puppeteer.executablePath()
  }
};

exports.config = config;
Add Node Scripts for CI/CD #
To build, test and deploy properly on CI, we add the following scripts into our package.json configuration file.
"scripts": {
  "build-prod": "ng build --prod",
  "test-ci": "ng test --no-watch --no-progress --browsers=ChromeHeadlessNoSandbox",
  "e2e-ci": "ng e2e --protractor-config=e2e/protractor-ci.conf.js",
  "deploy": "firebase deploy --token $FIREBASE_TOKEN --non-interactive"
}
Commit to GitLab #
Now we can share our local code with the remote repository in GitLab. You can find the git URL in the GitLab repository overview. For me the commands look like this:
# switch to project folder in ./angular-firebase-ci-demo
git remote add origin https://gitlab.com/kniklas/angular-firebase-ci-demo.git
git push origin master
The code should be visible in our GitLab repository now.
(4) Create Firebase Application #
Create a new project on https://console.firebase.google.com/.

Install Firebase Tools #
As we want to deploy to firebase we need the firebase tools. Let’s add them to our dev-dependencies and also install them globally on our machine:
npm install --save-dev firebase-tools
npm install -g firebase-tools
Add configuration for Firebase #
General Firebase project configuration. You need to use the project-id not the project name:
// ./angular-firebase-ci-demo/.firebaserc
{
  "projects": {
    "default": "angular-firebase-ci-demo"
  }
}
Firebase hosting configuration: Let’s only deploy what is inside the dist folder, which is created during the production build.
// ./angular-firebase-ci-demo/firebase.json
{
  "hosting": {
    "public": "dist/angular-firebase-ci-demo",
    "rewrites": [
      {
        "source": "**",
        "destination": "/index.html"
      }
    ]
  }
}
Commit Firebase Configuration #
We push all changes now to our master branch.
git add -A
git commit -m "firebase config"
git commit git push origin master
(5) Setup & Configure CI/CD in GitLab #
Configure CI/CD #
GitLab CI/CD is configured with a special file called .gitlab-ci.yml, which needs to be placed in the root folder of the project. GitLab automatically detects the file and runs the pipeline according to the configuration. Let’s add the following file to get started with a simple 3 step pipeline, which includes build, test and deployment to production with caching and storing of build artifacts.
image: node:10

build:
  stage: build
  cache:
    paths:
      - node_modules/
  script:
    - npm install --quiet
    - npm run build-prod
  artifacts:
    paths:
      - dist/

test:
  stage: test
  cache:
    policy: pull
    paths:
      - node_modules/
  script:
    # install dependencies to use chrome w/ puppeteer
    - apt update && apt install -yq gconf-service libasound2 libatk1.0-0 libc6 libcairo2 libcups2 libdbus-1-3 libexpat1 libfontconfig1 libgcc1 libgconf-2-4 libgdk-pixbuf2.0-0 libglib2.0-0 libgtk-3-0 libnspr4 libpango-1.0-0 libpangocairo-1.0-0 libstdc++6 libx11-6 libx11-xcb1 libxcb1 libxcomposite1 libxcursor1 libxdamage1 libxext6 libxfixes3 libxi6 libxrandr2 libxrender1 libxss1 libxtst6 ca-certificates fonts-liberation libappindicator1 libnss3 lsb-release xdg-utils wget
    - npm run test-ci
    - npm run e2e-ci

deploy_prod:
  stage: deploy
  environment:
    name: production
    url: $FIREBASE_URL
  only:
   - master
  dependencies:
    - build
  cache:
    policy: pull
    paths:
      - node_modules/
  script:
    - npm run deploy
Explanation of the Configured Pipeline #
With image: node:10 we tell our pipeline which docker container should be used for the build. For Angular 6 we require Node 10.x.
We separated the pipeline into 3 jobs: build, test and deploy_prod. Each step is executed independently on the image we defined, one after another. The pipeline stops whenever an error occurs. Example: If build fails, test and deploy_prod will not be executed.
With caches: path: node_modules/ we cache all node_modules which are downloaded during the installation of dependencies. This will speed up the subsequent jobs of the pipeline as they are all executed on a blank image. The default cache-policy is pull-push. That means, the files which are defined to be cached, get pulled from the cache repository before any script runs within the job. After all scripts run, the files are pushed back to the cache repository.
For the test and deploy_prod job we define the same folder to be cached but with the cache-policy pull, because we do not need to write the cache back. This speeds up the process.
With the command only: master we tell the deploy_prod job to only run, if changes on the master branch occur. With that, we make sure, that not every change on feature or other branches gets deployed to production.
With the command dependencies: build we tell the deploy_prod job to fetch those artifacts which we defined in the build job. This way we do not need to build it again and make sure that we do not deploy something else.
To track deployments to the prod environment we use the command environment which tells GitLab to consider this Job as a production deployment. Find more information here on GitLab Environments.
The main part of each job is the script: section which has the following tasks:
- Build: Install all required modules which are described in package.json and build the artifacts which we want to deploy.
- Test: Install required libraries to run chrome on the docker image as discussed in puppeteer’s troubleshooting documentation. Then execute Karma and Protractor tests.
- Deploy: Deploy artifacts to Firebase.
If any command fails, the whole pipeline fails. That means, a failed test will prevent from deploying to the server (which is good as we do not want to break the production).
Set environment variables in GitLab #
In our pipeline script we define two environment variables.
FIREBASE_TOKEN, which is used to auth GitLab against Firebase andFIREBASE_URL, which is the URL of our project and only used as a meta information for our environment configuration in GitLab.
We get the token by typing on our command line the following:
firebase login:ciThe token we configure in Settings > CI/CD > Variables.

Important: Never store passwords or other confidential information in git. Instead make use of environment variables.
Test Pipeline #
Now commit any change to master or merge to master, and you will see a deployment to Firebase. If you commit to any other branch, only the build and test jobs will run.
Alternative Docker Image #
The pipeline is currently "poisoned" with a statement to install required libraries for chrome. Without these libraries chrome is not working and quits with errors. A cleaner approach is to use a custom docker container, which includes these libraries. This is more friendly to maintain and speeds up the pipeline. How this could look like is described in puppeteer’s troubleshooting documentation.
Bonus #
Skip jobs in Pipeline #
Sometimes we simply want to update an unimportant file, such as readme, and do not want to run the pipeline or only some part of it. This can be achieved by adding an exception to a job. In this scenario, I added the following configuration to all three defined jobs:
except:
    variables:
      - $CI_COMMIT_MESSAGE =~ /skip-ci/
If we now include the keyword skip-ci in our commit message, the job with the above except configuration will not be executed.
You may also enjoy

Empowering Your Data Analytics with GPT-3 and SAP CAP
Answer free text questions against the DB using GPT-3.
SAP CAP Adapter to expose OData as custom REST Service
Let's build an adapter with SAP CAP to transform an OData Service to a custom REST Service
SAP CAP with Social Login and RBAC using Auth0
Unchain SAP CAP: How to enable social login and role based access control using Auth0
How to deploy SAP CAP Anywhere with Docker
Deploy SAP CAP on Heroku and containerize it with Docker