
Software Architect | Software Engineer | Principal Consultant | Paraglider | PhD
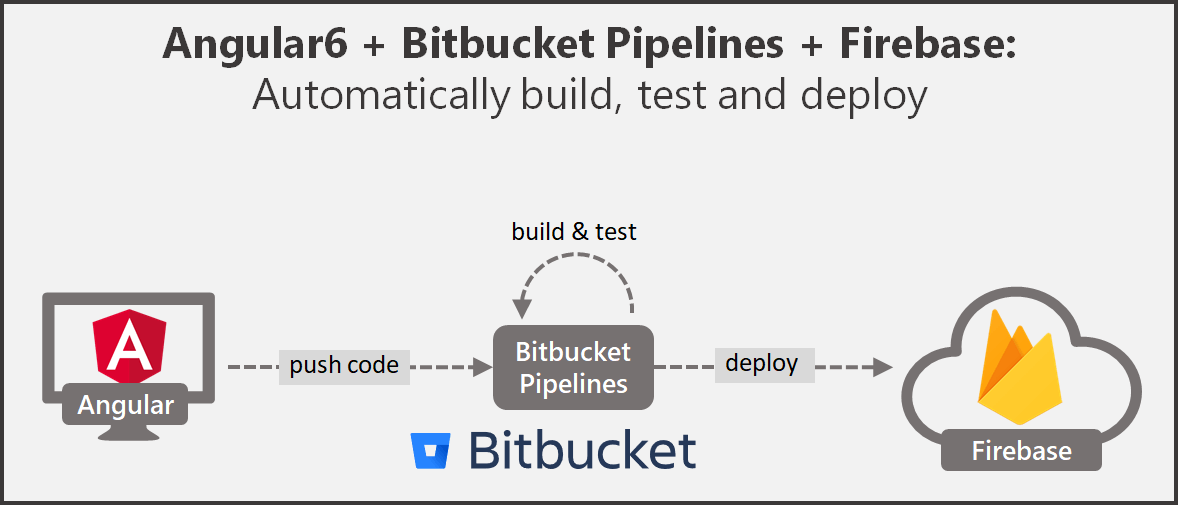
CI/CD with Angular 6 & Firebase & Bitbucket Pipelines
Automate build, test and deployment using Bitbucket Pipelines
Motivation to invest in CI/CD #
Modern development practices are reducing batch sizes of work significantly to, e.g., speed up time to market or get customer feedback earlier. Classic release cadences of once or twice a year are not applicable anymore to keep pace with the market in more and more industries. Instead releases are done in extrem cases every 11.6 seconds at amazon (status as of 2011). Building releases by hand, executing manual tests and handing over code to operations via ticket systems who then try to deploy by hand, are obviously not working any more.
Continuous Integration (CI) is a development practice which requires developers to integrate their code into a shared repository frequently, usually several times a day. Every check-in is verified by building the code and executing tests to detect problems early. (Compare: ThoughtWorks)
Continuous Deplyoment (CD) is a strategy to automatically deploy the code to production after all automated tests were passed during the CI phase. (Compare: Techtarget)
The 2017 State of DevOps Report motivates why CI/CD is beneficial to apply in comparison to classic approaches:
- Quality: 5x lower change failure rate
- Delivery: 440x faster lead time from commit to deploy
- Delivery: 46x more frequent code deployments
- Happy teams: 44% more time spent on new features and code

The automation of build, test and deployment are the most typical steps which can be automated. In this article we will automatically build, test and deploy an Angular 6 application to Firebase hosting on every commit to the master branch. To automate the process we use Bitbucket Pipelines.
In earlier articles I already demonstrated CI/CD using Bitbucket Pipelines for
- CakePHP via FTP to shared hosting server and
- CakePHP to Heroku.
Outline #
- Create Bitbucket Repository
- Create Angular 6 demo application
- Create Firebase project
- Configure Bitbucket Pipeline
Prerequisites #
(1) Create a Bitbucket repository #
First we create a new Bitbucket repository. You can find my demo repository here: https://bitbucket.org/kainiklas/angular-firebase-ci-demo

(2) Initialize Angular application #
For this demonstration we create our Angular application with the Angular CLI. If you have not installed the CLI yet, use the following command to do so:
npm install -g @angular/cliIf you have already installed an older version of the angular CLI, use the following command to upgrade to the latest version as described here:
npm uninstall -g @angular/cli
npm cache verify
npm install -g @angular/cli@latest
Then we can create our Angular skeleton application:
ng new angular-firebase-ci-demoIf you are interested in what you just created start it with the build in server:
cd angular-firebase-ci-demo
ng serve -o
The command should automatically start your browser and navigate to http://localhost:4200/.
Configure Test with Puppeteer #
The default test behavior is to start Chrome and execute the tests. On our CI environment we do not have Chrome installed and we do not want to start an GUI based application anyway. Therefore, we utilize the puppeteer package which includes chrome and which we can then start in a headless mode which means without GUI.
First, we include a dev-dependency to puppeteer:
npm install --save-dev puppeteerThen we configure our karma.conf.js to use ChromeHeadless instead of Chrome. Additionally, we need to use the -no-sandbox option, to make it work on our CI environment. Further, we only want to let the test cases run once which we can configure with the flag singleRun.
// ./angular-firebase-ci-demo/src/karma.conf.js

const puppeteer = require('puppeteer');
process.env.CHROME_BIN = puppeteer.executablePath();
module.exports = function (config) {
  config.set({
    (...)
    browsers: [
      'ChromeHeadlessNoSandbox'
    ],
    customLaunchers: {
      ChromeHeadlessNoSandbox: {
        base: 'ChromeHeadless',
        flags: ['--no-sandbox']
      }
    },
    singleRun: true
  });
};
Commit to Bitbucket #
Now we can share our local code with the remote repository in Bitbucket. You can find the git URL in the Bitbucket repository overview. For me the commands look like this:
# switch to project folder in ./angular-firebase-ci-demo
git remote add origin https://kainiklas@bitbucket.org/kainiklas/angular-firebase-ci-demo.git
git push origin master
The code should be visible in our Bitbucket repository now.
(3) Create Firebase Application #
Create a new project on https://console.firebase.google.com/.

Install Firebase Tools #
As we want to deploy to firebase we need the firebase tools. Let’s add them to our dev-dependencies and also install them globally on our machine:
npm install --save-dev firebase-tools
npm install -g firebase-tools
Add build and deployment command #
In our package.json we add the following two commands for production build and deployment. We will use them later in our pipeline.
"scripts": {
  "build-prod": "ng build --prod",
  "deploy": "firebase deploy --token $FIREBASE_TOKEN --non-interactive"
},
Add configuration for Firebase #
General Firebase project configuration:
// ./angular-firebase-ci-demo/.firebaserc

{
  "projects": {
    "default": "angular-firebase-ci-demo"
  }
}
Firebase hosting configuration. Let’s only deploy what is inside the dist folder which is created during the production build.
// ./angular-firebase-ci-demo/firebase.json

{
  "hosting": {
    "public": "dist/angular-firebase-ci-demo",
    "rewrites": [
      {
        "source": "**",
        "destination": "/index.html"
      }
    ]
  }
}
Commit Firebase Configuration #
We need to push all changes now to our master branch.
git add -A
git commit -m "firebase config"
git commit git push origin master
(4) Setup Bitbucket Pipeline #
Configure Pipeline #
We navigate to our repository on Bitbucket and navigate to Pipelines in the left navigation menu. The first time we click on it, it may take some time until we see something (~ 5–10 seconds). We scroll down the page and choose JavaScript. Replace the content of the auto-generated bitbucket-pipelines.yml file with the following content and commit the file:
image: node:10

pipelines:
  branches:
    master:
      - step:
          name: "Build, test and deploy to firebase production"
          deployment: production
          caches:
            - node
          script:
            - npm install --quiet
            - apt update && apt install -yq gconf-service libasound2 libatk1.0-0 libc6 libcairo2 libcups2 libdbus-1-3 libexpat1 libfontconfig1 libgcc1 libgconf-2-4 libgdk-pixbuf2.0-0 libglib2.0-0 libgtk-3-0 libnspr4 libpango-1.0-0 libpangocairo-1.0-0 libstdc++6 libx11-6 libx11-xcb1 libxcb1 libxcomposite1 libxcursor1 libxdamage1 libxext6 libxfixes3 libxi6 libxrandr2 libxrender1 libxss1 libxtst6 ca-certificates fonts-liberation libappindicator1 libnss3 lsb-release xdg-utils wget
            - npm run test
            - npm run build-prod
- npm run deployNote: We will get some errors as we have not configured the environment variables yet.
Explanation of the configured pipeline #
With image: node:10 we tell our pipeline which docker container should be used for the build. For Angular 6 we require Node 10.x.
Using branches: master: we define, that the pipeline should run as soon as we check in code to the master branch.
With caches: -node we cache all node_modules which are downloaded during the installation of dependencies. This will speed up the subsequent runs.
To track deployment we use the command deployment: production which tells Bitbucket to consider this Pipeline as a production deployment. Find more information here on Bitbucket Deployments.
The last part are the scripts in the script: section.
- Install all required modules which are described in
package.json - Install required libraries to run chrome on the docker image as discussed in puppeteer’s troubleshooting documentation
- Execute test cases
- Build production ready artifacts
- Deploy artifacts to Firebase
If any command fails, the whole pipeline fails. That means, a failed test will prevent from deploying to the server (which is good as we do not want to break the production).
Set environment variables in Bitbucket #
In our pipeline script we have defined the environment variable FIREBASE_TOKEN which is used to auth ourselves against Firebase. We get the token by typing on our command line the following:
firebase login:ciThe token we put into out pipeline in Settings > Pipeline > Repository variables.
Important: Never store passwords or other confidential information in git. Instead make use of, e.g., securely stored environment variables for passwords.

Now commit to master or rerun the pipeline, and you will see a deployment to Firebase.
Alternative Docker Image #
The pipeline is currently "poisoned" with a statement to install required libraries for chrome. Without these libraries chrome is not working and quits with the following error:
Cannot start ChromeHeadless /opt/atlassian/pipelines/agent/build/node_modules/puppeteer/.local-chromium/linux-609904/chrome-linux/chrome: error while loading shared libraries: libX11-xcb.so.1: cannot open shared object file: No such file or directoryA cleaner approach is to use a custom docker container, which includes these libraries. This is more friendly to maintain and speeds up the pipeline. How this could look like is described in puppeteer’s troubleshooting documentation.
Final thoughts #
Additionally, we could define test or staging environments to which we deploy after code has been merged to a specific branch.
You may also enjoy

Empowering Your Data Analytics with GPT-3 and SAP CAP
Answer free text questions against the DB using GPT-3.
SAP CAP Adapter to expose OData as custom REST Service
Let's build an adapter with SAP CAP to transform an OData Service to a custom REST Service
SAP CAP with Social Login and RBAC using Auth0
Unchain SAP CAP: How to enable social login and role based access control using Auth0
How to deploy SAP CAP Anywhere with Docker
Deploy SAP CAP on Heroku and containerize it with Docker