
Software Architect | Software Engineer | Principal Consultant | Paraglider | PhD
CI/CD of CakePHP with Bitbucket Pipelines & Heroku
Automatically build, test and deploy a CakePHP application using Bitbucket Pipelines to Heroku.
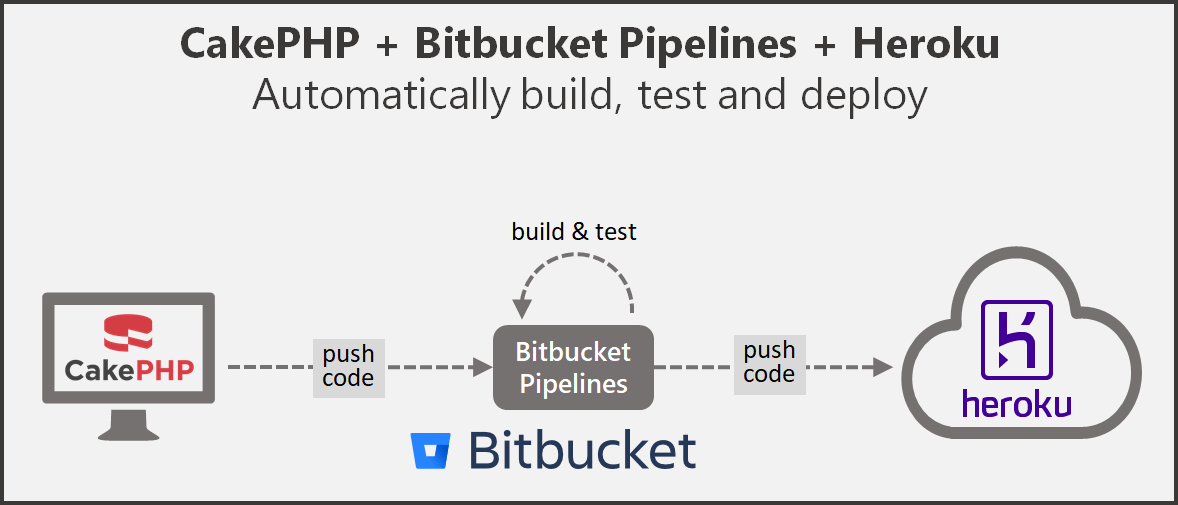
In my last article I demonstrated how to automatically build, test and deploy a CakePHP application using Bitbucket Pipelines via FTP to a shared hosting provider after code is committed to Bitbucket. Today we are going to deploy it to Heroku, a cloud application platform.
Prerequisites #
Create a Bitbucket repository #
First we create a new Bitbucket repository.

Initialize and commit CakePHP application #
For this demonstration we create a skeleton CakePHP application by using the following command which we type into our command line:
composer create-project --prefer-dist cakephp/app cakephp-ci-heroku-demoIf you are interested in what you just created start it with the build in server and start your favorite browser:
cd cakephp-ci-heroku-demo
bin/cake server -p 8765
Now we can share the local git repository on our development machine with the remote repository in Bitbucket. You can find your git URL in the Bitbucket repository overview. For me the commands look like this:
# switch to porject folder in ./cakephp-ci-heroku-demo

git init
git remote add origin https://kainiklas@bitbucket.org/kainiklas/cakephp-ci-heroku-demo.git

git add -A
git commit -m "Initial commit"
git push origin master
The code should be visible in our Bitbucket repository now.
Create Heroku Application #
Now we create a new Heroku application.

Note: We could also use the build-in git repository and the pipeline feature from Heroku and do not use Bitbucket at all. But I prefer to have a separate code repository with all its features, such as pull requests.
Initialize Bitbucket Pipeline #
We navigate to our repository on Bitbucket and click on Pipelines in the left navigation menu. The first time we click on it, it will take some time until we see something (~ 5–10 seconds). We scroll down the page and choose PHP. Then we commit the file and the pipeline starts automatically.
At first, it looks all nice and pretty, but then the pipeline fails with some problems which we will fix later.
#1: cakephp/cakephp 3.5.11 requires ext-intl * -> the requested PHP extension intl is missing from your system.

#2: symfony/debug v4.0.3 requires php ^7.1.3 -> your PHP version (7.1.1) does not satisfy that requirement.

And 5 more.
Configure Bitbucket Pipeline for CakePHP & Heroku #
Our pipeline will first install all dependencies via composer for the CakePHP application and then runs all PHPUnit tests. If everything works fine we push the code to the head of our Heroku git repository in order to have it deployed on Heroku. The generic URL to the Heroku git repository looks like this:
https://heroku:$HEROKU_API_KEY@git.heroku.com/$HEROKU_APP_NAME.gitNote: The dollar sign $ indicates a variable name in Bitbucket Pipeline annotation.
Set environment variables in Bitbucket #
The URL above contains an API key which should not be hard coded anywhere. So we configure it as an environment variable in Bitbucket. We find our API key on the Heroku account page. The environment variables can be set on the settings page in Bitbucket of the repository. Do not forget to check the box "secured" to store the API key securely.

Important: Never store passwords or other confidential information in git. Instead make use of, e.g., securely stored environment variables for passwords.
Configure the pipeline #
Lets check out the pipeline file which we generated earlier in Bitbucket and configure it for CakePHP now:
# switch to ./cakephp-ci-heroku-demo
git pull origin master
Open the filebitbucket-pipelines.yml to configure it.
# This is a sample build configuration for CakePHP >=3.5 + Heroku
# Official Bitbucket Pipeline documentation: https://confluence.atlassian.com/x/e8YWN
# Only use spaces to indent .yml configuration.
# -----

image: edbizarro/bitbucket-pipelines-php7

pipelines:
  branches:
    master:
      - step:
          caches:
            - composer
          script:
            - composer install --no-interaction --no-progress --prefer-dist
            - composer test
            - git push https://heroku:$HEROKU_API_KEY@git.heroku.com/$HEROKU_APP_NAME.git HEAD
Explanation of the configured pipeline #
With image: edbizarro/bitbucket-pipelines-php7 we tell our pipeline which docker container should be used for the build. For CakePHP we require a higher PHP 7 version as the default php image provides. Further, we would need to install composer and the php extension intl using the default PHP 7 container. Otherwise our build will fail as we already saw earlier. The docker image edbizarro/bitbucket-pipelines-php7 contains the necessary tool and php extension (and more which we do not need for the demo).
Using branches: master: we define, that the pipeline should run as soon as we check in code to the master branch.
With caches: -composer we cache all downloaded composer packages which are downloaded during the installation of dependencies. This will speed up the subsequent runs.
The last part are the scripts in the script: section. We 1) install all required modules, 2) test the application and 3) deploy it to Heroku. If any command fails, the whole pipeline fails. That means, a failed test will prevent from deploying to the server (which is good as we do not want to break the production).
The deployment statement makes use of our environment variables which. We can use any set variable by putting a $ and the name of the configured variable.
Complement the composer.json descriptor #
Before we deploy anything into production we want to run all PHPUnit tests to make sure that everything works. Therefore, we need to include it in our composer file:
composer require --dev phpunit/phpunitTest the Pipeline #
Testing our pipeline is pretty easy. We simply need to change a file and push it to the master branch. As we have not checked in any file into our repository yet, we can test the pipeline by checking in our work now:
# switch to ./cakephp-ci-heroku-demo
git add -A
git push origin master
The pipeline should be green now and push the code to heroku. Heroku detects automatically that the pushed application is a PHP application, as it contains a composer.json file, and "installs" the application with the following command:
composer install --no-dev --prefer-dist --optimize-autoloader --no-interactionNote: If you are wondering why the demo app produces an error ("The application is trying to load a file from the DebugKit plugin"), this is due to the fact, that the DebugKit is part of the development dependencies and won’t be installed. And this is a good thing, as we do not want to make debug information publicly accessible.
More information on PHP on Heroku can be found on the following help pages:
- https://devcenter.heroku.com/articles/php-support
- https://devcenter.heroku.com/articles/getting-started-with-php
- https://devcenter.heroku.com/articles/deploying-php
Further readings #


You may also enjoy

Empowering Your Data Analytics with GPT-3 and SAP CAP
Answer free text questions against the DB using GPT-3.
SAP CAP Adapter to expose OData as custom REST Service
Let's build an adapter with SAP CAP to transform an OData Service to a custom REST Service
SAP CAP with Social Login and RBAC using Auth0
Unchain SAP CAP: How to enable social login and role based access control using Auth0
How to deploy SAP CAP Anywhere with Docker
Deploy SAP CAP on Heroku and containerize it with Docker